Windows Phone 7 : Data binding et externalisation du template d’une listbox
24 janvier 2013
Après avoir vu comment procéder à la géolocalisation, je vous propose de continuer notre apprentissage de Windows Phone en nous tournant aujourd’hui vers les listbox et plus particulièrement le data binding.
Le data binding, qu’est-ce que c’est ?
Le data binding est une technique qui nous permet de lier une listbox à une liste d’objets afin de les afficher selon un template bien précis.
Ce qu’on veut faire
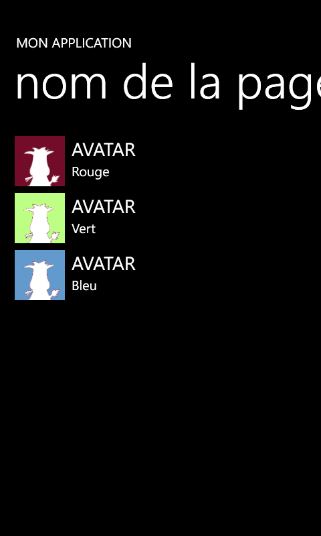
Pour cet exemple, je vous propose d’implémenter une liste de contacts. Pour chaque contact nous allons afficher sa photo, son nom et son prénom selon le template suivant :

L’implémentation
La classe métier
La première étape consiste à créer la classe qui représentera notre contact. Dans notre cas, notre classe aura quatre propriétés :
- un identifiant ;
- un nom ;
- un prénom ;
- une photo (il s’agit d’une chaîne de caractères vers une photo de notre projet).
Voici alors ce que ça donne :
namespace DataBinding
{
    public class Contact
    {
        public int Id { get; set; }
        public string Nom { get; set; }
        public string Prenom { get; set; }
        public string Photo { get; set; }
    }
}
La liste statique
Nous allons également créer une liste statique de trois contacts qui nous servira de source pour alimenter notre listbox. Voici la classe :
namespace DataBinding
{
    public class Repertoire
    {
        private static List<Contact> repertoire;

        static Repertoire()
        {
            repertoire = new List<Contact>
            {
                new Contact() { Id = 1, Nom = "AVATAR", Prenom = "Rouge", Photo = "Asset/avatar_rouge.png" },
                new Contact() { Id = 2, Nom = "AVATAR", Prenom = "Vert", Photo = "Asset/avatar_vert.png" },
                new Contact() { Id = 3, Nom = "AVATAR", Prenom = "Bleu", Photo = "Asset/avatar_bleu.png" },
            };
        }

		public static List<Contact> GetRepertoire()
		{
			return repertoire;
		}
	}
}
Le template
En temps normal, pour mettre en place notre template, nous aurions utilisé le code XAML suivant :
<!--ContentPanel - placez tout contenu supplémentaire ici-->
<Grid x:Name="ContentPanel" Grid.Row="1" Margin="12,0,12,0" VerticalAlignment="Top">
    <Grid.ColumnDefinitions>
        <ColumnDefinition Width="85"/>
        <ColumnDefinition Width="*"/>
    </Grid.ColumnDefinitions>

    <Image Width="75" Height="75" Margin="10,10,0,0" Source="/DataBinding;component/Asset/avatar_rouge.png" Stretch="Uniform" />
    <StackPanel Grid.Column="1" Margin="10,10,0,0">
        <TextBlock Text="NOM" FontSize="28" />
        <TextBlock Text="Prénom" />
    </StackPanel>
</Grid>
Afin de pouvoir faire le data binding, nous allons modifier quelques petites choses. Il suffit de faire le parallèle entre les propriétés de notre objet Contact et le template. Pour ce faire, on utilise la syntaxe suivante :
{Binding Property}
Ce qui donne après modification de notre template :
<!--ContentPanel - placez tout contenu supplémentaire ici-->
<Grid x:Name="ContentPanel" Grid.Row="1" Margin="12,0,12,0" VerticalAlignment="Top">
    <Grid.ColumnDefinitions>
        <ColumnDefinition Width="85"/>
        <ColumnDefinition Width="*"/>
    </Grid.ColumnDefinitions>

    <Image Width="75" Height="75" Margin="10,10,0,0" Source="{Binding Photo}" Stretch="Uniform" />
    <StackPanel Grid.Column="1" Margin="10,10,0,0">
        <TextBlock Text="{Binding Nom}" FontSize="28" />
        <TextBlock Text="{Binding Prenom}" />
    </StackPanel>
</Grid>
Il est maintenant temps de placer ce code comme template d’une listbox :
<!--ContentPanel - placez tout contenu supplémentaire ici-->
<Grid x:Name="ContentPanel" Grid.Row="1" Margin="12,0,12,0" VerticalAlignment="Top">
    <ListBox x:Name="lstBox">
         <ListBox.ItemTemplate>
            <DataTemplate>
                <Grid>
                    <Grid.ColumnDefinitions>
                        <ColumnDefinition Width="85"/>
                        <ColumnDefinition Width="*"/>
                    </Grid.ColumnDefinitions>

                    <Image Width="75" Height="75" Margin="10,10,0,0" Source="{Binding Photo}" Stretch="Uniform" />
                    <StackPanel Grid.Column="1" Margin="10,10,0,0">
                        <TextBlock Text="{Binding Nom}" FontSize="28" />
                        <TextBlock Text="{Binding Prenom}" />
                    </StackPanel>
                </Grid>
            </DataTemplate>
        </ListBox.ItemTemplate>
    </ListBox>
</Grid>
Le code behind
Dans le code behind, nous allons alimenter notre listbox avec notre liste statique. Nous allons faire tout ça dans la méthode OnNavigatedTo() :
protected override void OnNavigatedTo(System.Windows.Navigation.NavigationEventArgs e)
{
    base.OnNavigatedTo(e);

    //On indique la source de données
    lstBox.ItemsSource = Repertoire.GetRepertoire();
}
Le résultat :
Vous devriez alors avoir le résultat suivant :
Récupérer notre objet
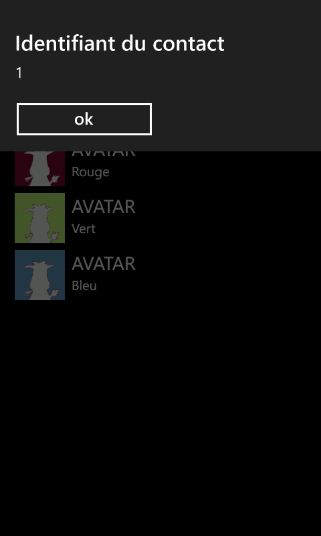
Avant de voir comment il est possible d’externaliser le template, je vous propose de voir comment récupérer l’objet sur lequel on clique. Tout d’abord, associez à votre listBox une méthode pour l’évènement SelectionChanged.
Voici alors le code qui permet de récupérer l’objet :
private void lstBox_SelectionChanged(object sender, SelectionChangedEventArgs e)
{
    //On récupère la listbox qui a levé l'évènement
    ListBox lst = sender as ListBox;

    if (lst.SelectedIndex != -1)
    {
        //On récupère notre objet métier
        Contact contact = lst.SelectedItem as Contact;

        //On affiche l'identifiant
        MessageBox.Show(contact.Id.ToString(), "Identifiant du contact", MessageBoxButton.OK);

        //On annule la sélection
        lst.SelectedIndex = -1;
    }
}
Externaliser le template de la listbox
Externaliser le template d’une listbox dans un autre fichier peut s’avérer très utile pour, par exemple, ne pas surcharger votre fichier XAML, ou lorsque vous travaillez avec un graphiste.
Le principe est très simple. Nous allons créer un contrôle utilisateur dans lequel nous allons placer le template de notre listbox. Dans mon cas, le contrôle utilisateur s’appelle TemplateListBox :
<UserControl x:Class="DataBinding.TemplateListbox"
    xmlns="http://schemas.microsoft.com/winfx/2006/xaml/presentation"
    xmlns:x="http://schemas.microsoft.com/winfx/2006/xaml"
    xmlns:d="http://schemas.microsoft.com/expression/blend/2008"
    xmlns:mc="http://schemas.openxmlformats.org/markup-compatibility/2006"
    mc:Ignorable="d"
    FontFamily="{StaticResource PhoneFontFamilyNormal}"
    FontSize="{StaticResource PhoneFontSizeNormal}"
    Foreground="{StaticResource PhoneForegroundBrush}"
    d:DesignHeight="480" d:DesignWidth="480">

    <Grid x:Name="LayoutRoot">
        <Grid.ColumnDefinitions>
            <ColumnDefinition Width="85"/>
            <ColumnDefinition Width="*"/>
        </Grid.ColumnDefinitions>

        <Image Width="75" Height="75" Margin="10,10,0,0" Source="{Binding Photo}" Stretch="Uniform" />
        <StackPanel Grid.Column="1" Margin="10,10,0,0">
            <TextBlock Text="{Binding Nom}" FontSize="28" />
            <TextBlock Text="{Binding Prenom}" />
        </StackPanel>
    </Grid>
</UserControl>
Dans le fichier XAML qui contient notre listbox, nous allons ajouter le namespace suivant :
<!--ContentPanel - placez tout contenu supplémentaire ici-->
<Grid x:Name="ContentPanel" Grid.Row="1" Margin="12,0,12,0" VerticalAlignment="Top">
    <ListBox x:Name="lstBox" SelectionChanged="lstBox_SelectionChanged">
        <ListBox.ItemTemplate>
            <DataTemplate>
                <local:TemplateListbox />
            </DataTemplate>
        </ListBox.ItemTemplate>
    </ListBox>
</Grid>
Finalement, il ne nous reste plus qu’à indiquer que le template de notre listbox est un contrôle utilisateur :
xmlns:local="clr-namespace:DataBinding"
Exécutez ! Vous ne verrez aucune différence !